Introduction:
You followed the steps Here and were unable to isolate the issue. Your network team is still breathing on your neck.
If you are using vSphere 5.5 or above the gods of virtualization are with you. They have blessed you with with a cool tool , “pktcap-uw” comes to the rescue.
The instruction to use the tool can be found Here
Symptoms:
- Intermittent network outage for the Virtual machines
- vMotion of a VM causes a network outage
- Intermittent network outage for a VM which gets resolved by the vMotion of a VM to another host.
- Intermittent network outage for a VM which gets resolved when VM’s networking configuration is modified using edit settings option.
Exceptions:
- Following procedure will not be suitable for environments with vxLans.
- Port channels can only be investigated with the support of network team.
Where to collect Packet Capture?
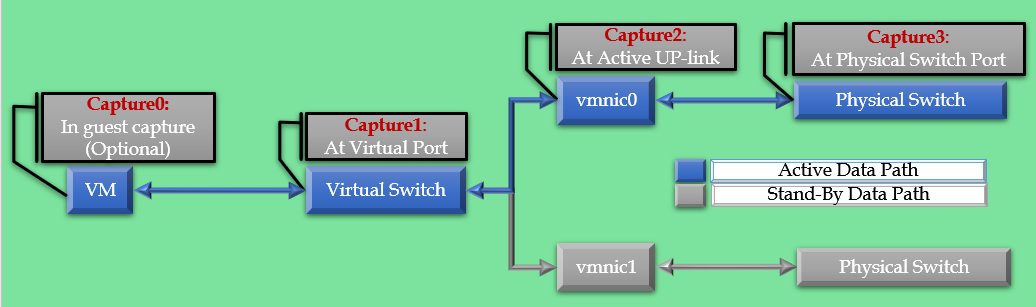
For effective isolation of the issue the packets must be captures at multiple points. The capture points are highlighted in the graphic below. All captures must run simultaneously
Procedure:
Since we have already followed the steps Here, We have following information available
- VM/s facing the issue
- Pattern of failures
- Physical Nic or Nics pinned to the VM/s
- Virtual Port ID for VM/s facing the issue
Step1: Prepare for running captures
Capture0: In guest capture (Optional)
This will need a packet capturing utility inside the VM facing the issue. You can use Wireshark or Netmon for windows and tcpdump for Linux.
This network capture is optional as ESXi has an ability to capture the same data at the Virtual Port as well. Further, a packet capturing utility might not be a approved application for your guest environment.
The captures 1 and 2 can be collected using ESXi shell. Starting ESXi 5.5 VMware ships pakcap-uw tool to achieve this.
Capture1: At Virtual Port
The syntax of the command that you will need to use is
pktcap-uw --switchport 67108868 -o /vmfs/volumes/5971fda4-66f5e4d3-71cd-405cfd1ac342/Net_Caps/67108868_DIR0 --dir 0 -c 50 & pktcap-uw --switchport 67108868 -o /vmfs/volumes/5971fda4-66f5e4d3-71cd-405cfd1ac342/Net_Caps/67108868_DIR1 --dir 1 -c 50
Do not run the command just yet.
Capture2: At Active UP-link
The syntax of the command that you will need to use is
pktcap-uw --uplink vmnic0 -o /vmfs/volumes/5971fda4-66f5e4d3-71cd-405cfd1ac342/Net_Caps/vmnic0_DIR0 --dir 0 -c 50 & pktcap-uw --uplink vmnic0 -o /vmfs/volumes/5971fda4-66f5e4d3-71cd-405cfd1ac342/Net_Caps/vmnic0_DIR1 --dir 1 -c 50
Do not run the command just yet.
Capture3: At Physical Switch Port
Physical switch ports are outside the scope of ESXi. Hence. there is no way of collecting this data without a little help from your network admin.
Talk to your network admin and provide him the details he needs to achieve this.
Step2: Start the captures
The captures must be started in the order below
- Request your network admin to start the capture At Physical Switch Port
- Run the command below to start the capture at ESXi host. The Command will run Capture1 and Capture2 simultaneously
pktcap-uw --switchport 67108868 -o /vmfs/volumes/5971fda4-66f5e4d3-71cd-405cfd1ac342/Net_Caps/67108868_DIR0 --dir 0 -c 50 & pktcap-uw --switchport 67108868 -o /vmfs/volumes/5971fda4-66f5e4d3-71cd-405cfd1ac342/Net_Caps/67108868_DIR1 --dir 1 -c 50 & pktcap-uw --uplink vmnic0 -o /vmfs/volumes/5971fda4-66f5e4d3-71cd-405cfd1ac342/Net_Caps/vmnic0_DIR0 --dir 0 -c 50 & pktcap-uw --uplink vmnic0 -o /vmfs/volumes/5971fda4-66f5e4d3-71cd-405cfd1ac342/Net_Caps/vmnic0_DIR1 --dir 1 -c 50
The text marked red must be changed as per the environment.
“-c” defines the number of packets to capture you must tune this so that the captures continue to run throughout the investigation process.
“–dir” defines the direction of capture. By default pktcap-uw captures only in dir 0. Hence it is must to use –dir 0 and — dir 1. –dir 0 is for inbound and –dir 1 is for outbound.
Step3: Start a ping from Impacted VM
Log in to the console of the impacted VM and start a ping to a destination that we know is not working. Make sure to run a predefined number of pings (less than the value of -c). The syntax of the command that you will need to use is
Windows:
ping -n 10 192.168.10.10
Linux:
ping -c 10 192.168.10.10
The text marked red must be changed as per the environment.
Review Part III to understand the analysis of the collected data.